Monday, April 30, 2012

Finished and Done

 I auditioned two different corners: the scrappy look and the more solid look.
 I chose the more solid look.
I love the way things turned out. The whole process of digging out locating the ruler, sewing up the scrappy strips, drafting the edge pieces and auditioning fabrics to make the connection to each block.
It reminds me of my grandma's quilts.
Final measurement 56 1/2 inches square and I don't think I'll be bordering the quilt..... LOL

Strings flying across the ocean

These string blocks are on their way
from the Netherlands to Canada.
Jeanneke sent them for part of our Anything Goes string quilt.
Yesterday, my friend Terry, who started the whole thing
 brought me two more.
I have 35 on my wall, and several more on their way to me.
Thanks for all these great blocks!

Friday, April 27, 2012

Some Old String Quilts


Thought you'd like to see a few old string quilts I picked up recently on a trip to Tennessee.


Rocky Road to Kansas.  The antique dealer thought these were 1940's prints.  All hand pieced.

This one is all silkies--rayon dress prints I think.  The dealer thought they were pre-1940.

The blocks are about 4".

Thursday, April 26, 2012

Strippy Selvages

I've been bogged down lately with sewing things I HAD TO sew rather than what I wanted to sew.  I finally broke free and began a strippy selvage quilt.  I had an old quilt back that had been removed from a tied quilt and it was on it's way to the trash can when inspiration hit.  I washed that sorry old stained fabric, ironed it and cut it into 9" foundation squares.  I cut 1 1/2" strips from a cute red and white checked fabric for my center strips and pieced selvages out from there.  Any style, any color, as long as they were wide enough and long enough.  I tried to use mostly selvages with words.  Or dots.  Fun, fun, fun!  Here are the first four blocks trimmed (8 1/2") and laying side by side.

Any more challenge blocks coming?

Our challenge quilt is growing, with a total of 33 blocks.
Yesterday, I received Paulette's three blocks,
and they're playing nicely with the others on the wall.
Anyone else still sending blocks?
I'd like a minimum of 36 to make a  48 inch square,
but I was hoping to get this close to single size (60 by 80).
I've been making blocks from my stash, but my strings are getting depleted.
If anyone still wants to join in and make an 8.5 inch block
on an 8 inch foundation, leave a comment.
Thanks to all of you for playing along.

Monday, April 23, 2012

Granny's String Quilt

 I think it was early February when I first posted the box of strings and a partial quilt top I had from my mother-in-law who had passed away ten years ago. As you can see above, the strings and blocks are now a completed quilt!! Yeah! I did a 'floating border' with details on my blog, still using more of the strings. I did have to add a few fabrics to make it come out to a nice size.
 I took all the blocks apart, added more with her fabrics and mine and there were some of her blocks that were not quite large enough so they became backart.
This is the back. The yellow fabric was also in the box so I put it to good use. This quilt was a pleasure to complete and I had special memories of my mother-in-law as I sewed. She would love the final product as pastels were her favorite! For more photos, you can view them on my blog.

Friday, April 20, 2012

Finally Catching Up on Another UFO and Joining The String Thing Along

Hi everyone, my name is Vivian and I am glad to finally get to join you!  I had planned since last summer to put my sons back to work sewing up strings for Denim Blue Lagoon Blocks.  I had started this back in 2009 and wanted to make heavy winter quilts for my sons using scrap strings and denim from their outgrown jeans.  The pattern is from Fons & Porter and theirs was originally made up in batiks.
  

 This project was on my "PHD (Projects Half Done) Challenge" list last year.  And I again made plans to work on it when all the bags of old denim jeans to be used for the project were piled up around the cutting table (which is in my dining room) and needed to be cleared out before we had company over for the Thanksgiving holiday. When that deadline was not met, they got stowed away to await the New Year.  So when I saw this Quilt-Along at the start of this year I thought "three times a charm", right?  Even so, I've been so busy sewing other projects that I had been unable to clear enough work space for me to work with the boys.  But I've been a little better organized lately and thought I would get to this when the boys went on Spring Break last week week but this time non-quilty things got in the way.  The bright side is that when you face such roadblocks, the Quilt Gods are always in your corner!  For some reason, our cable service went out Wednesday afternoon.  That's right, no TV, internet or phone for a whole afternoon.  So what does a Mom do to entertain her kids?  Have them so sew strips instead!


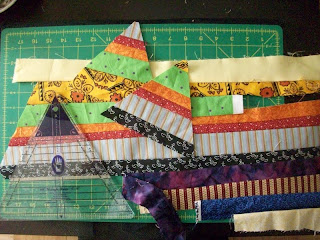
My youngest (not that young anymore at 13) did this strip set and I've cut them into the 60 degree triangle units I need for the blocks.  Now that we've gotten started again, I want to continue to have them sew some strings for me until we have enough blocks for two twin size tops (I'm such a slave driver!).

As the string triangles accumulate, I will cut diamonds in "lights" and "darks" out of the old and outgrown jeans I've collected. As you can see, what is considered light or dark will depend on what it is teamed up with when the rows of blocks are constructed to form the "tumbling blocks" pattern.


Whatever denim I don't wind up using to make these will go towards making other denim quilts or accessories (I have a great tote bag pattern that I want to make).  The bonus is that if I can finally process all the jeans I have accumulated, this will also allow me to get that stash a little more manageable, compact and organized.


The pattern directions call for the triangles and diamonds to be joined into rows and then the rows are joined to make the tops.

As I sew them, I will lay them on the bed to see how many more pieces for each row and then how many rows of blocks I need for each top.  Back when we started this project, I had lucked up on a sale of some 60" wide fleece fabrics at Nancy's Notions which will be the backing for these quilts.  Given the weight of the denim and the fleece, I will probably not have to put additional batting in them.


I'm hoping that working on this will be as much fun for them as it will be for me. I doubt it but at least they will be able to say they had a hand in making their own quilts!  I probably won't post here again until I make some significant progress on the tops.  But if you'd like to follow the day to day progress or see what else I am working on, you can find me here.  Thanks to Brenda and the rest of you for all the inspiration and quilty eye candy you  have provided me to date.  It gave me just the kick in the rear I needed to get back to this!

Thursday, April 19, 2012

My "Cobweb" Quilt Top

Rhonda, I wish I had your ruler!  I found this pattern called "Cobweb" in an old block pattern book and reproduced it on EQ, making myself paper foundation patterns.  I used feed sack scraps and solids (can you see where I ran a little short on the green?)  It's "next up" in my list of things to quilt, so you'll see it again when it's finished! 

Kite Drama

 I was combing through my stash of books, magazines and quilt patterns when I ran across the pattern you see in the background. It was then and only then that I remembered I had purchased the special ruler to go with it. Great! I have an abundance of scraps and strips of fabrics.... this would be a perfect time to start another quilt.
 Several hours later, I had enough strips sewn together to begin the next step....
I cut seven sets of eight kites that are needed to make a block or at least the block that I was interested in.
This kite shape has so many possibilities and I was so excited to see all the various fabric placements.

The first block option is the great looking design and the beauty of it is I don't have to match seams or pin anything.

Block option 2 is this four pointed star that I placed on an audition tone-on-tone fabric.

I then realized that if I was going with option 1, it needed something to square the block up.  After a couple of frustration hours of drafting, I came up with a workable template which needed to be reversible.

This is how the kite looks with the template fabrics sewn on. I went with the scrappy look because I really need to get rid of use up that large basket of scraps.

And that brings me to my next dilemma...... LOL.... back to the old drafting paper..... to be continued.

Tuesday, April 17, 2012

Special Collection

I've been collecting what most would say are fabrics that you just wouldn't buy for your stash. I love these strange fabrics such as pebbles, bricks, tree bark, wood panels and so on. So if you're wondering what to do with some of those difficult fabrics, never fear, put them in a string quilt.
Here's a string quilt that I made from some of them. I dressed up the borders with a little applique. This is one of my favorite quilts. It measures roughly 54 inches square.


Block by block it's growing!

Two lively blocks from Ginny in Brooklyn came in the mail today, along with a postcard of a quilt show in Brooklyn this weekend. If anyone sees a string quilt at this show, please share it here.
Thanks for contributing string blocks to this challenge quilt!

Using Border Fabric

Here's a way to use directional border fabric in a string block as the center strip.
I used scissors to cut the paisley print fabric you see into 13 1/2 inch strips and placed each one down the middle diagonally on 12 1/2 inch foundations of muslin.
I then did the sew, flip and press method, sewing darker fabrics of varied widths on one side of the paisley fabric and lighter tone-on-tones on the opposite side. 

Here you can see what four block look like with the paisley seeming to give a framed look.

 Here is the final quilt top measuring roughly 80 inches square.  I love this look and now always look for border fabrics in a different way.

Monday, April 16, 2012

It's growing on my wall

I've had fun opening my mail lately. Today I got a block from Julie, adding to the ones I got from Carol, LeeAnn, Leisa, V., and Helen. I made eight blocks, and today I  put them up on my design wall. I put a set of light ones in the middle, and I'm seeing how the quilt looks built around that.

I'm loving the variety of fabrics, colours, and strip widths here. If you still want to join in, leave a comment below.

I'm looking for 8.5 inch blocks, pieced on an 8 inch fabric foundation, with a black strip in the middle. Use a variety of colours and prints. Leave a comment below if you want to send it to me to make up in a charity quilt.

Just Like Potato Chips

I couldn't stop with just one! After I'd made this block:

I went through my stash and cut up more foundation squares. Two days later I had this on my design wall:


Now I'm scrounging around for more foundation fabrics and looking at my stash to see what else I can cut up into strings. These appear kind of dark to me; I want to throw in more light and color. Rearranging them will help to distribute the lighter blocks too. This is just how they ended up on the wall as I completed each block. I don't know whether to be grateful that Brenda finally moved me to try out this technique or to bemoan the fact that now I have even more projects I want to make!

Spring Strings

My mother-in-law just celebrated her 80th birthday and I racked my brain to try and come up with something to give to her that she would enjoy.  I finally decided on a mini makeover for her room at the nursing home.  I made two spring string table toppers, added a little pot of brightly colored silk flowers and some newly framed family photos and it all made for a very happy birthday indeed!

Saturday, April 14, 2012

More frugal stringy goodness.....

This snuggle size string quilt was a 'playtime with scraps' project. Friend Betsy gave me the leftovers(mostly strings and strips) from her DDs graduation quilt. It's flannel, lattice and all.

I added bits from my flannel scraps and pieced these 6.5" blocks. No foundation, just sewed to each other as I picked them out. When the flannel ran out, I was finished! I added the lattice and tied the quilt. As often happens, make a quilt, and a need for one appears.

Friends of my DD were able to bring this darling red headed 3 yr. home to be their forever child. The quilt seemed perfect for him, and the purpose for making it came full circle.

Scraps, orphan blocks and adopted children are very, very dear to my heart. I have had all of them in my life since 1967 with the arrival our first child...by adoption, of course.

Friday, April 13, 2012

My Phone Book Quilt

Hi, I'm Lori in North Carolina and my blog is Talk is Cheap Quilts (http://talkischeapquilts.blogspot.com).  I love scrap quilts and string quilts, Tonya's letters and ANYTHING Gwen Marston does.

Here is a lap quilt that I finished recently.  I call it my Phone Book Quilt because I used phone book pages as my foundation (I find that I can sew straighter and faster with a foundation).  Here is just the top:
And here's a picture of the finished product with cat inspection in progress.
Here's a close-up so you can see the quilting.  I used a combination of tying and big stitch.  Oops, there are still a few basting threads in this picture, too!

Big strings

Thanks to LeeAnn, Helen, Leisa, and V. for the "ugly" string blocks
I found in my mailbox this week.
I'll post a picture this weekend of all of them on my design wall.

Here's a little string quilt inspiration: My friend Yvonne with her 50th birthday quilt, with string blocks submitted by her friends, and handquilting by Yvonne and more friends. Visit my blog for the details.

Wednesday, April 11, 2012

Scrappy String Thing Playtime...

I had a lot of fun during this 'playtime'. There were a bunch of flannel or brushed cotton strings and even a few strips in a box of donated Orphan blocks. I wondered what I could make with them, and if it would be enough for some sort of a top?


So I sewed, sewed and sewed. I kept going until the plastic bag was empty and this was the result.

I managed to make 25 blocks that are about 8.5". It happened totally without planning. If I had planned, I might have discarded the lightest ones. I'm finding I like string and crumb pieces better if you leave out things that read as white. The cream and lighter plaids seem to work for me, but not those white ones. I suppose it should have a border or borders added, but it will still be rather an odd size. Any suggestions? The top is about 40" square right now. It was not foundation pieced.

Saturday, April 7, 2012

An earlier string quilt project...


I'm finding new inspiration as more stringy projects are getting posted ! It's very exciting to see what others are doing, and along that line, I decided to share an older string project. One picture(which should be first,but who knows?) is what the blocks look like. I chose to go with a dark navy/black center string. The widths varied from block to block. I added a variety of lights to one side, and assorted darks and jewel tones on the other. I was very pleased with the outcome. The blocks are 8.5" which was easy to work with, and I used mostly recycled fabrics for the foundation block.


Friday, April 6, 2012

Well, maybe there's an ugly one in the mix

I dug into the string box to make a few blocks
for the ugly challenge, outlined here.
I used whatever I had, but I also looked for
oldies and uglies.
I'm thinking some of these aren't so great up close

My centre black strips are various sizes on purpose
since I didn't ask for a specific size,
I thought I'd use a variety

But once the blocks are set together, I'm liking the effect.
Not matchy matchy at all.
Keep them coming!